 |
| Baseline Single Exposure and Final HDR photo |
I thought since our
+Weekly Photo Project 2013 group just finished up the theme of HDR that I go into a little more depth on how I created my image. Most of my steps were taken from
+Trey Ratcliff's wonderful
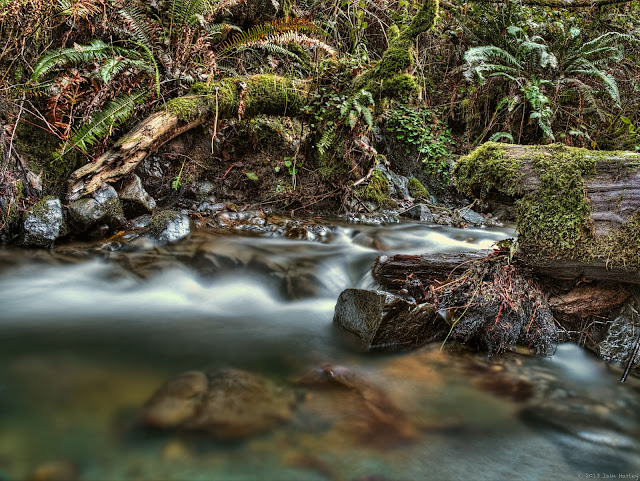
+Stuck In Customs HDR walk through and changed to better fit my equipment and workflow. The above two photos show what the camera felt was the correct exposure for the scene and what my finished HDR photo turned out to be. And after the break I'll outline how I got from the shot on the left to the shot on the right.
 |
| The 0 Exposure |
Here's Exposure 0. It's what the camera decided on how to handle the light in the photo. One mistake I did on this whole set of exposures was to have my aperture too small af f16. I wanted to capture the flowing water but I didn't need an f16 to do that. I probably could have gotten away with an f8 and not blown out so much of the water. So besides that problem the shot doesn't capture much of what's in the darker parts of the photo. That's where the six other shots, or brackets, come in.
 |
| The Brackets |
Above we see all seven brackets now in Aperture, starting with Exposure Level 0 on the right, moving to -1 to +1, -2 and +2, and -3 and +3. The photos are all RAWs. Many people use JPEGs, but I use RAWs because if I end up not liking the HDR I can still have a lot of flexibility in using a single exposure in RAW format. Most people just use 3 shots (-3 or -2, 0 +3 or +2) but my camera doesn't have a lot of flexibility when choosing how many brackets and at what interval, so the only way for me to get a -3 to +3 range to is to shoot seven shots along the way. I could do the brackets manually but that is more time consuming.
At this point I now typically send them straight to Photomatix Pro. I would normally take the time to DeNoise each file in Topaz Labs DeNoise, but to be quite honest I'm too lazy for it and I find the option to let Photomatix remove noise to be good enough most times, with just a little extra DeNoise work after the HDR is created.
 |
| The Created HDR |
Here's what it looks like after it leaves Photomatix. We can see more into the shadows and the foliage has more depth to it. The details found in the shadows come from the over exposed (+1, +2, +3) brackets and the details in highlight areas come from our underexposed (-1, -2, -3) brackets. This is great, but HDR often leaves photos feeling flat due to low contrast, which makes sense because we're trying to bring out more information in both the darks and light areas, so I almost never consider a photo finished when it comes out of HDRing. With this photo I wanted to saturate the colors more, bring in some contrast and try to minimize the overblown whites in the running water.
Now the photo goes for what I call finishing. Using Topaz Labs' great photoFXlab I can access my Topaz plugins quickly and easily and make use of layers. First stop is to DeNoise to take care of the noise that seeps into HDR images. I love DeNoise for it's ability to remove noise and retain detail. After that it's off to Adjust where I do what I think of as large scale changes to saturation and exposure to get the overall mood and look I'm looking for. It's in here that I dealt with the overblown whites, add in some contrast and get the saturation so that greens are green. And then I finish it all off in Detail to bump the details of the photo up a little bit, and deblur it. Great thing about Detail (and most Topaz Labs plugins) is that I can brush out the effects, which I did on the water to keep the smooth flowing look.
 |
| Finished |
I think I accomplished what I wanted in this final shot. The water smooth and flowing with the white highlights toned down (but still too noticeable for my eyes). The greens of the moss and ferns now pops some more with the changes in saturation, along with the other colors. The shadows have shadow areas have come back but are more detailed and more interesting to the eye. All in all I was quite pleased with this shot as it turned out better than I thought it would when I was behind the camera taking the photos. I hope this is of some help to you.
Equipement Used:
Camera: Panasonic Lumix DMC-G3
Lens: Kit 14-42mm f3.5-f5.6
Tripod
Software:


Comments
Post a Comment