A couple weeks ago I mentioned I was waiting for a new filter an infrared filter. Well it came in, and for the most part it doesn't disappoint. Without getting too technical infrared is a type of radiation that is just off the visible spectrum of light that the human eye can see. For the purpose of my photography it is not the type of imaging that gives thermal images, which requires a very different setup. What has always drawn my eye to IR photography is the different look and feel that can be shown. This has been a type of photography I've always wanted to try but wasn't sure how to get into it. Essentially there are two ways to get into it.
The easiest and cheapest way is to get an IR filter that fits on the front of your lens. The drawback to this are long exposure times. Since most modern cameras have an anti-IR filter over the sensor inside of the camera you have to leave the shutter open longer to allow more IR light to hit the sensor. And longer exposures mean more noise and more of a chance to capture movement. On a typical sunny day I'm seeing exposure times of over 3 seconds for ISO 100, so a tripod is a much and a windless day is preferred. I find that ISO 400 though is a decent compromise on blur and noise and typically gets an exposure down to about a second.
The other, and best way, is a dedicated infrared camera setup. You send a camera into a specialized service which will remove the anti-IR filter and install an IR filter in it's place. The benefits of this are shorter exposure times which result in less blur and noise. The downside is now that camera can only shoot IR shots. This might be what I do with my GF2 when the time comes to upgrade it.
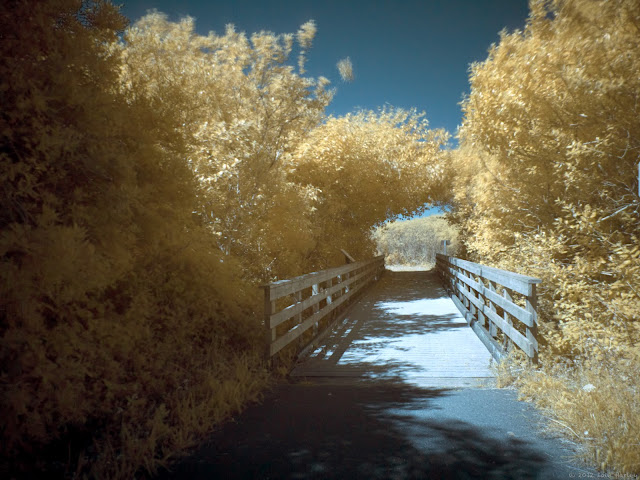
One of the first shots with the IR filter on that I really liked is shown below. The process for processing IR shots doesn't seem to be too difficult. Thankfully there is no dedicated piece of software needed, like in HDR, but you do need a decent photo editing software application that allows for adjusting white balance, and for extra credit one that allows for channel mixing. This is helpful if your shot originally had blue skies in it because in IR they come out a dull red instead. The shot below went through a little denoise, adjust the white balance to the brightest areas in the photo (typically foliage) then swapping the red and blue channels around to bring back a blue sky.
 |
| Infrared foot bridge |


Comments
Post a Comment